本文最后更新于 1322 天前,其中的信息可能已经有所发展或是发生改变。
1. Context
Context是应用程序与系统之间沟通的桥梁,是应用程序访问系统资源的接口
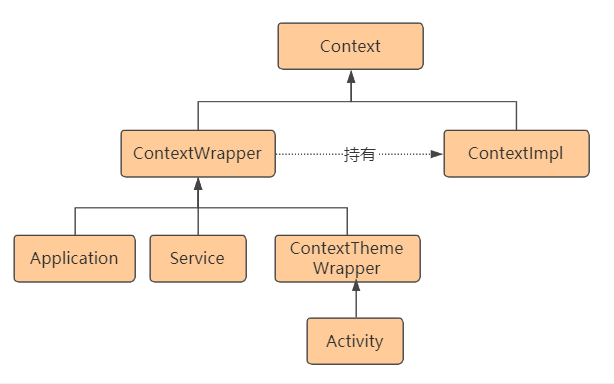
- 使用到了装饰者模式,把封装操作实现在ContextImpl中。
- ContextProvider使用的是Application的context,Broadcast使用的是activity的context
- Activity的getBaseContext,即ContextImpl 真正的Context接口的逻辑实现类
- 使用Application启动的Activity必须指定task以及标记为singleTask,因为Application是没有任务栈的,需要重新开一个新的任务栈
- Application创建:(类加载和反射)
- ActivityThread类 -> performLaunchActivity方法内的 makeApplication
- LoadedApk类 -> makeApplication方法内
2.1 ContextImpl.createAppContext 创建ContextImpl实例
2.2 mActivityThread.mInstrumentation.newApplication 创建Application
2.3 ContextImpl.setOuterContext(app); 将Application赋值给ContextImpl
**
以下都是相关通过attach附加
**
Instrumentation.class(api29)
// 这里的context 就是ContextImpl
public Application newApplication(ClassLoader cl, String className, Context context)
        throws InstantiationException, IllegalAccessException,
        ClassNotFoundException {
    Application app = getFactory(context.getPackageName())
            .instantiateApplication(cl, className);
    app.attach(context);
    return app;
}

Application.class(api29)
final void attach(Context context) {
    attachBaseContext(context);
    mLoadedApk = ContextImpl.getImpl(context).mPackageInfo;
}

ContextWrapper.class(api29)
Context mBase;
protected void attachBaseContext(Context base) {
    if (mBase != null) {
        throw new IllegalStateException("Base context already set");
    }
    mBase = base;
}
- Activity创建 (类加载和反射)
- ActivityThread类 -> handleLaunchActivity方法内的 performLaunchActivity
- performLaunchActivity方法内:mInstrumentation.newActivity、r.packageInfo.makeApplication(同上)
- Service创建 (类加载和反射)
- ActivityThread类 > handleCreateService方法
- 类加载和反射创建service,随后创建ContextImpl,并同上诉一样调用attach
- BroadCast创建
- ContextImple类 -> registerReceiver方法 -> registerReceiverInternal
- registerReceiverInternal -> ReceiverDispatcher中有个InnerReceiver(Receiver是没有跨进程通信能力的,而广播需要AMS的调控,InnerReceiver是维护联系的)
- registerReceiverInternal的参数 getOuterContext() 获取的就是创建广播的上下文Context,一般都是在Activity内创建,所以这个Context一般都是Activity。
- ContextProvider创建
- ActivityThread类 > handleBindApplication方法 installContentProviders
- installContentProviders方法 installProvider
2.1 localProvider.getIContentProvider() 创建ContentProvider
2.2 调用attachInfo 将 Context等相关信息附加
2. Window
Window原文章链接
– viewRootImpl是window和view之间的桥梁,viewRootImpl可以处理两边的对象,然后联结起来
1. setView方法内的 mWindowSession是一个AIDL,可以调用WMS方法
// 一个应用只有一个IWindowSession单例。
public static IWindowSession getWindowSession() {
 synchronized (WindowManagerGlobal.class) {
     if (sWindowSession == null) {
         try {
             ...
             sWindowSession = windowManager.openSession(
                     new IWindowSessionCallback.Stub() {
                         ...
                     });
         }
         ...
     }
     return sWindowSession;
 }
}

window的添加过程是通过PhoneWindow对应的WindowManagerImpl来添加window,内部会调用WindowManagerGlobal来实现。WindowManagerGlobal会使用viewRootImpl来进行跨进程通信让WMS执行创建window的业务。
每个应用都有一个windowSession,用于负责和WMS的通信,如ApplicationThread与AMS的通信。
– PhoneWindow本身不是真正意义上的window,他更多可以认为是辅助Activity操作window的工具类。
– windowManagerImpl并不是管理window的类,而是管理PhoneWindow的类。真正管理window的是WMS。
– PhoneWindow可以配合DecorView可以给其中的window按照一定的逻辑提供标准的UI策略
– PhoneWindow限制了不同的组件添加window的权限(内部有一个token属性)。
2.1 Activity的Window创建
- Activity中使用getWindowManager方法获取到的就是应用的PhoneWindow对应的WindowManagerImpl
- attach方法内创建了PhoneWindow,并mWindow.setWindowManager 将PhoneWindow和WindowManager绑定
- setWindowManager方法内 设置mAppToken,创建mWindowManager(WindowManagerImpl)
- attach后会回调onCreate方法,onCreate内会生成DecorView并设置相关的布局
- ActivityThread的handleResumeActivity方法中 会回调Activity的onResume方法,而onResume方法内就包含了 WindowManager.addView 将DecorView添加到视图上
>创建PhoneWindow -> 创建WindowManager -> 创建decorView -> 利用windowManager把DecorView显示到屏幕上
>回调onResume方法的时候,DecorView还没有被添加到屏幕,所以当onResume被回调,指的是屏幕即将到显示,而不是已经显示
2.2 PopupWindow的Window创建
- 根据参数构建popupDecorView
- 把popupDecorView添加到屏幕上
2.3 Dialog的Window创建 (与Activity类似)
- dialog和popupWindow不同,dialog创建了新的PhoneWindow,使用了PhoneWindow的DecorView模板。而popupWindow没有
- dialog的显示层级数更高,会直接显示在Activity上面,在dialog后添加的popUpWindow也会显示在dialog下
2.4 总结
- PhoneWindows和WindowManagerImpl
- 添加View => WindowManagerGlobal获取Session,创建一个ViewRootImpl去访问WMS,在使用ViewRootImpl去绘制View。 WindowManagerImpl内部持有WindowManagerGlobal这样就简单易操作
- PhoneWindow只是对Window的封装,内部持有DecorView,并可以通过ViewRootImpl进View的操作
- PhoneWindow内部只持有一个decorView,只管理一个view 树,并不是window 容器;PhoneWindow只是提供了 token 机制来校验子window的合法性
