本文最后更新于 1449 天前,其中的信息可能已经有所发展或是发生改变。
一、开始配置
项目build.gradle配置
dependencies {
        // 暂时不能超过4.0.0版本
        classpath "com.android.tools.build:gradle:3.5.3"
        classpath "org.jetbrains.kotlin:kotlin-gradle-plugin:$kotlin_version"

        classpath "com.tencent.tinker:tinker-patch-gradle-plugin:1.9.14"
}
App下的build.gradle配置
plugins {
    id 'com.android.application'
    id 'kotlin-android'
    id 'kotlin-android-extensions'
    id 'com.tencent.tinker.patch'
}
// 将一些配置单独提取出来放在一个文件内
apply from:'tinker.gradle'

android {
    signingConfigs{
        release {
            keyAlias 'iichen'
            keyPassword '
            storeFile file('./iichen.keystore')
            storePassword ''
        }
        debug {
            keyAlias 'iichen'
            keyPassword ''
            storeFile file('./iichen.keystore')
            storePassword ''
        }
    }

    dexOptions {
        //支持大型项目
        jumboMode = true
    }

    defaultConfig {
        multiDexEnabled true
        // 定义在 gradle.properties文件内  TINKER_ID = 102,用于可以在代码内获取
        buildConfigField "String" , "TINKER_ID" , "\"${TINKER_ID}\""
    }

    buildTypes {
        release {
            minifyEnabled false
            proguardFiles getDefaultProguardFile('proguard-android-optimize.txt'), 'proguard-rules.pro'
            signingConfig signingConfigs.release
        }
        release {
            minifyEnabled false
            signingConfig signingConfigs.debug
        }
    }
}

dependencies {
    implementation 'org.ow2.asm:asm:7.0'
    implementation 'org.ow2.asm:asm-commons:7.0'


    api("com.tencent.tinker:tinker-android-lib:1.9.14") { changing = true }
    implementation("com.tencent.tinker:tinker-android-loader:1.9.14") { changing = true }

    // 注解构建application使用
    annotationProcessor("com.tencent.tinker:tinker-android-anno:1.9.14") { changing = true }
    compileOnly("com.tencent.tinker:tinker-android-anno:1.9.14") { changing = true }
    implementation "com.android.support:multidex:1.0.3"
}
tinker.gradle太长文件下载
tinker.gradle
// 打修复补丁需要修改的位置
ext {
    //for some reason, you may want to ignore tinkerBuild, such as instant run debug build?
    tinkerEnabled = true
    //基准apk路径,即需要修复的包以改包为基准 运行gradle->tinker->thinkerPathchRelease/Debug
    // 构建新包和基准包之间的 diff patch文件包
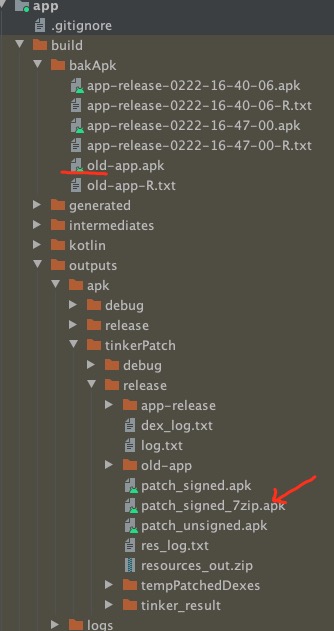
    tinkerOldApkPath = "${bakPath}/old-app.apk"
    //未开启混淆,则不需要填写
    tinkerApplyMappingPath = "${bakPath}/old-app-mapping.txt"
    //基准apk中的R文件路径
    tinkerApplyResourcePath = "${bakPath}/old-app-R.txt"
    //如果你修复了res文件,需要指定你bug版本的R.txt文件
    tinkerBuildFlavorDirectory = "${bakPath}/flavor"
}
二、构建Application
2.1 非注解的方式
// 写在清单文件内     android:name=".IIApplication"
class IIApplication :
    TinkerApplication(
        ShareConstants.TINKER_ENABLE_ALL,
        IIApplicationLike::class.java.getName()
)
internal class IIApplicationLike(
    application: Application?,
    tinkerFlags: Int,
    tinkerLoadVerifyFlag: Boolean,
    applicationStartElapsedTime: Long,
    applicationStartMillisTime: Long,
    tinkerResultIntent: Intent?
) : DefaultApplicationLike(
    application,
    tinkerFlags,
    tinkerLoadVerifyFlag,
    applicationStartElapsedTime,
    applicationStartMillisTime,
    tinkerResultIntent
) {
    override fun onCreate() {
        super.onCreate()
        // 这里实现SDK初始化,
    }

    /**
     * install multiDex before install tinker
     * so we don't need to put the tinker lib classes in the main dex
     *
     * @param base
     */
    @TargetApi(Build.VERSION_CODES.ICE_CREAM_SANDWICH)
    override fun onBaseContextAttached(base: Context) {
        super.onBaseContextAttached(base)
        MultiDex.install(base)
        setTinkerApplicationLike(this)
        setUpgradeRetryEnable(true)
        installTinker(this)
        Tinker.with(application)
    }

    companion object {
        private const val TAG = "Tinker.SampleApplicationLike"
    }
}
2.2 注解的方式
非注解的方式可以看到需要多创建一个文件,使用注解则直接在第二个文件上加一个注解即可
@DefaultLifeCycle(application = "com.example.tinkertest.SampleApplication", flags = ShareConstants.TINKER_ENABLE_ALL, loadVerifyFlag = false)
public class SampleApplicationLike extends DefaultApplicationLike {
    private static final String TAG = "Tinker.SampleApplicationLike";

    public SampleApplicationLike(Application application, int tinkerFlags, boolean tinkerLoadVerifyFlag,
                                 long applicationStartElapsedTime, long applicationStartMillisTime, Intent tinkerResultIntent) {
        super(application, tinkerFlags, tinkerLoadVerifyFlag, applicationStartElapsedTime, applicationStartMillisTime, tinkerResultIntent);
    }

    @Override
    public void onCreate() {
        super.onCreate();
        // 这里实现SDK初始化,
    }
}
2.3 上面涉及的文件
<provider
          android:name="androidx.core.content.FileProvider"
          android:authorities="${applicationId}.provider"
          android:exported="false"
          android:grantUriPermissions="true">
    <meta-data
               android:name="android.support.FILE_PROVIDER_PATHS"
               android:resource="@xml/provider_paths"/>
</provider>

<service
         android:name=".service.SampleResultService"
         android:exported="false"/>

<?xml version="1.0" encoding="utf-8"?>
<paths>
    <external-path
        name="external_storage_root"
        path="." />
</paths>
三、打修复包
- 当前线上包即 基准包 如:old-app.apk 即写在thinker.gradle文件内的基准包 名字要一样
- 当前已修复的代码。直接运行:
3.1 加载补丁包
// 注意Android10及之后的 文件存储更迭变化 可能导致 读取不到补丁包的情况
val file = getExternalFilesDir("tinker")

file?.apply {
    // 将上述生成的补丁包放到应用的私有目录下
    // /sdcard/Android/data/应用包名/files/patch_signed_7zip.apk
    val patch = File("${file.absolutePath}/patch_signed_7zip.apk")
    if(patch.exists()){
        Toast.makeText(this@MainActivity,"当前基准包版本号:${BuildConfig.TINKER_ID}",Toast.LENGTH_LONG).show()
        if (file.exists()) {
            if (file.length() > 0) {
                Toast.makeText(this@MainActivity,"补丁包存在 $patch",Toast.LENGTH_SHORT).show()
                TinkerInstaller.onReceiveUpgradePatch(this@MainActivity, patch.absolutePath)
            }
        }else{
            Toast.makeText(this@MainActivity,"补丁包不存在",Toast.LENGTH_SHORT).show()
        }
    }else{
        Log.d("iichen","补丁包不存在")
    }
}
3.2 卸载补丁包
Tinker.with(applicationContext).cleanPatch();// 卸载所有的补丁
// 这个ID就是上述定义在 gradle.properties内
// 通过该ID来实现相应的逻辑 当然可以直接使用 官方的bugly统一管理
//Tinker.with(applicationContext).cleanPatchByVersion(BuildConfig.TINKER_ID)// 卸载指定版本的补丁
3.3 查看补丁包信息
val tinker = Tinker.with(applicationContext)
val patchNum = String.format("[补丁号] %s \n", tinker.tinkerLoadResultIfPresent.getPackageConfigByName(
                ShareConstants.TINKER_ID))
val patchVersion = String.format("[补丁版本] %s \n", tinker.tinkerLoadResultIfPresent.getPackageConfigByName("patchVersion"))
val patchSpace = String.format("[补丁占用空间] %s k \n", tinker.tinkerRomSpace)
Toast.makeText(this,"补丁信息:$patchNum $patchVersion $patchSpace",Toast.LENGTH_LONG).show()
加载补丁后需要重启应用来实现更新

